Installation Instructions for Low Voltage Submersible Heat shrink Joints

Cable
size
(mm2) |
L-1
(mm)
|
L-2
(mm)
|
K
|
| 1,5 - 4 |
80
|
50
|
Half length of
ferrule plus 5mm
|
| 6 - 16 |
100
|
60 |
- Prepare the cables according to dimensions shown in table.
- Thoroughly clean and rub (abrade) cable sheath on either side of the join to maximise bond between sealant and cable.
Note
1. Treat conductors (cores) carefully to prevent damage.
2. One side of the joint needs to be longer than the other side.
Voltage range: 600/1000V
2.1 Cable Sheath
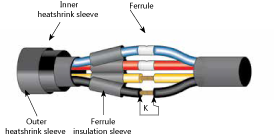
- Slide the outer and inner heat shrink sleeves over the cable sheath.
- Remove the core insulation as indicated by K (half ferrule length plus 5mm).
- Use the longer side of the joint to slide the ferrule insulation heatshrink sleeves over the individual cores.
- Slide ferrules into position.
2.2 Ferrule Sleeves
- Position all heat shrink sleeves over joint.
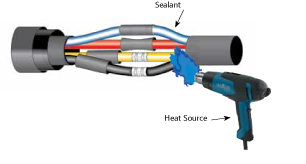
- Join conductors either by crimping or soldering according to approved methods and standards.
- Centrally position ferrule heatshrink sleeves over connecting ferrules and shrink into place.
- Apply heat circumferentially from the middle outwards until the internal sealant has melted, sleeves achieved a uniform wall thickness and have fully recovered.
2.3 Compact Joint
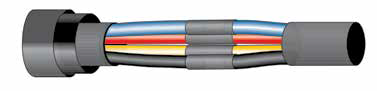
- Press cores firmly together to form a compact, neat joint.
2.4 Inner Heat Shrink Sleeve

- Position the outer heatshrink sleeve over the joint so that it overlaps equal distances on both sides of the cable and shrink into position.
- Apply heat circumferentially from the middle outwards until the internal sealant has melted, sleeves achieved a uniform wall thickness and have fully recovered.
2.5 Outer Heat Shrink Sleeve
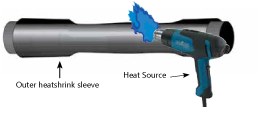
- Position the outer heatshrink sleeve over the joint so that it overlaps equal distances on both sides of the cable and shrink into position.
- Apply heat circumferentially from the middle outwards until the internal sealant has melted, sleeves achieved a uniform wall thickness and have fully recovered.
Caution: Take care not to overheat the heatshrink.
2.6 Ready for Use

- Joint is complete and the cable is ready to be re-energised.
Caution: Allow the joint to cool before applying any mechanical strain.
| 3. Recommended Application Tools |
| |
|
| HL1920E- Steinel Heat Gun |
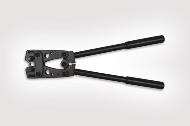
HD0650AU - Hex Crimper (Super Range) |
| |
|
|
|
- Output: 2000W
- Temperature rating 80°C - 600°C
- Protection class (without earth terminal): II
|
 |
- Crimping range: 6, 10, 16, 25, 35, 50mm2
- Hexagonal crimper with movable and rotating dies
- Tubular cable lugs and connectors
|
 |
